Anatomy

The Human Lymphatic System (The Immune System)

Artiphoria.AI

Lymphatic system (aka the ‘immune system) – organs, tissues, and vessels work as a team to transport lymph (excreted fluid from cells or tissues in the body) back into the bloodstream.

This immune “system” of organs remembers every microbe it has ever fought and defeated.[1] It works in unison to prevent pathogens from invading the body.

Lymph fluid plays an extremely important role in the immune system and evolves over the course of a lifetime. The current body of research suggests that hydration is essential for overall health and can support various bodily functions, including the immune system and definitely cognitive functions including memory, attention, and concentration[10]. However, more targeted research is needed to fully understand the direct impact of hydration on adaptive immunity. The role of hydration in the immune system, particularly its impact on adaptive immunity, remains an area that could benefit from further exploration and research.

The immune system is separated into two parts: Innate (genetic, including phagocytes (macrophages and neutrophils), dendritic cells, mast cells, basophils, eosinophils, natural killer (NK) cells and innate lymphoid cells) and Adaptive (characterized by specificity, immunological memory, and self/nonself recognition). T cells and B cells are the two major components of adaptive immunity[2].

Human Lymphatic System from BioDigital.com

Lymph is a clear fluid that contains a high concentration of white blood cells and plays an important role in the immune response. Lymph nodes and organs filter and transmit nutrients, lymph fluid, and waste between the body’s tissues and the bloodstream. Humans have over 4 million exocrine sweat glands and all of them are involved in immune function.

Sweating and the Lymph System

Perspiration[3] is the process of sweating and comes from the Latin word spirae which means to inspire, exhale, blow, breeze, breathe, or emanate. “Physiologists have long regarded sweating as an effective and safe means of detoxification, and heavy metals are excreted through sweat to reduce the levels of such metals in the body.”[6] Heavy metals are excreted through dynamic exercise moreso than simple exposure to a heated environment (saunas, steam rooms, etc). Certain heavy metals are excreted far more effectively through sweating such as Nickel (ni), Lead (pb), and Chromium (cr).[6] Mercury and arsenic can also be added to the list. There is a specifically higher rate of toxicity release through sweat during extreme forms of exercise. One can imagine that a heated yoga room can be extremely effective for the waste removal of heavy metals.

The Organs of the Lymphatic System

Kidneys (Dall-E)

However, this sweating hypothesis doesn’t portray a complete picture of the excretion of toxins from the body because there are several very specific organs that are also involved in this process which include:

Primary Organs of the Immune/Lymphatic System:

Bone Marrow (Dall-E)
  1. Bone marrow: The soft, spongy tissue found in bone cavities. Bone marrow produces all the cells of the human body, including lymph and blood cells and are primary immunological organs.
  2. Lymph nodes: Small organs shaped like beans, which are located all over the body and connect via the lymphatic vessels. This is where Killer T cells mature and differentiate.
  3. Kidney’s: play an underappreciated role in the immune system. While it’s primarily known for its functions in filtering blood, removing waste products, and regulating electrolytes, the kidney also has several key roles in immunity including: barrier function, Innate Immunity, Adaptive Immunity, Cytokine Production, Interplay with Systemic Immune Responses, and Resistance to Infection and Autoimmune Diseases.
  4. Lymphatic vessels: A network of channels all over the body that carries lymphocytes to the lymphoid organs and bloodstream. They play a key role in maintaining fluid balance in the body and in immune surveillance
  5. Thymus : Two lobes that join in front of the windpipe (trachea) behind the breastbone. The primary role of the thymus is in the development of T-lymphocytes (T cells), which are a type of white blood cell crucial for the adaptive immune system. These T cells are responsible for fighting off pathogens and are central to the body’s immune response.
  6. Adenoids : Two glands located at the back of the nasal passage. Infection of the adenoids is called adenoiditis. This can cause symptoms like a sore throat, stuffy nose, swollen neck glands, difficulty swallowing, and breathing problems. Adenoids are more prominent in children. They begin to grow from birth and reach their maximum size between the ages of 3 and 5 years. After this, they usually start to shrink and may nearly disappear by adolescence. Adenoids are part of the Waldeyer’s ring, which includes the tonsils and other lymphatic tissue in the throat and nasal cavity. They help detect and fight off pathogens that enter the body through the nose or mouth.
  7. Spleen: A fist-sized organ located in the belly (abdominal) cavity. One of the spleen’s primary functions is to filter blood. It removes old and damaged red blood cells from the bloodstream. This process is crucial for maintaining healthy blood cells in circulation. The spleen is an integral part of the immune system. It produces lymphocytes, which are white blood cells that fight infection. The spleen also helps identify and destroy bacteria and other pathogens in the blood. When the spleen breaks down red blood cells, it recycles the iron contained within them. This iron is then used to make new blood cells.
  8. Peyer patches: Lymphoid tissue in the small intestine. These patches are rich in B and T lymphocytes. B cells within Peyer’s patches can differentiate into plasma cells that produce immunoglobulins (antibodies), particularly IgA, which is crucial for immune functions in the gut.
  9. Tonsils: Two ovular masses in the back of the throat. Tonsils are part of the body’s lymphatic system and contribute to the immune defense. They act as a first line of defense against pathogens that enter the body through the mouth or nose. Tonsils contain immune cells that help fight infection. This is most likely WHY breathing through the nose can be so beneficial and stimulating for the immune system.
  10. Skin: Often overlooked as part of the immune system, the skin acts as a physical barrier to prevent the entry of pathogens. It also contains specialized cells of the immune system, such as Langerhans cells, which help to detect and fight infections.
  11. Liver: The liver contributes to immune defense by producing acute-phase proteins that increase in response to inflammation and by removing pathogens and toxins from the blood. The liver plays a crucial yet often underappreciated role in the immune system. It’s known primarily for its functions in metabolism, detoxification, and nutrient storage, but its immune-related roles are equally significant. The liver has a unique role in promoting immune tolerance, particularly to food antigens and gut microbial antigens. The liver contains Kupffer cells that are a type of macrophage, which means they can engulf and destroy bacteria, damaged cells, and other potentially harmful substances. Kupffer cells play a vital role in removing debris and pathogens from the blood. In summary, the liver’s role in the immune system is multifaceted. It acts as a sentinel for pathogens, produces vital immune proteins, helps regulate immune responses, and plays a unique role in promoting tolerance to food and gut microbes. This underscores the liver’s importance not just in metabolism and detoxification, but also as a key player in the body’s defense mechanisms.
Liver (Dall-E)
References:
  1. John Hopkins – The immune System
  2. Science Direct – Adaptive Immunity
  3. BioDigital – Lymphatic System
  4. Wikipedia – Spirae
  5. Biology Corner Anatomy
  6. BJD – Sweat Glands
  7. Taylor Francis Online – Physiology of sweat gland function: The roles of sweating and sweat composition in human health
  8. Pub Med – Excretion of Ni, Pb, Cu, As, and Hg in Sweat under Two Sweating Conditions
  9. Science Direct – Sweat and the Skin
  10. PLOS – The impact of water consumption on hydration and cognition among school children
  11. Science Direct – Waldeyer’s Ring
  12. Chat GPT – research
  13. DALL-E (OpenAI’s Image Generation Model)
  14. Artiphoria.ai – Image creation

The Human Lymphatic System (The Immune System) Read More »

artiphoria-prana-entering-the-body

The Anatomy of Breath: A Yogi’s Guide

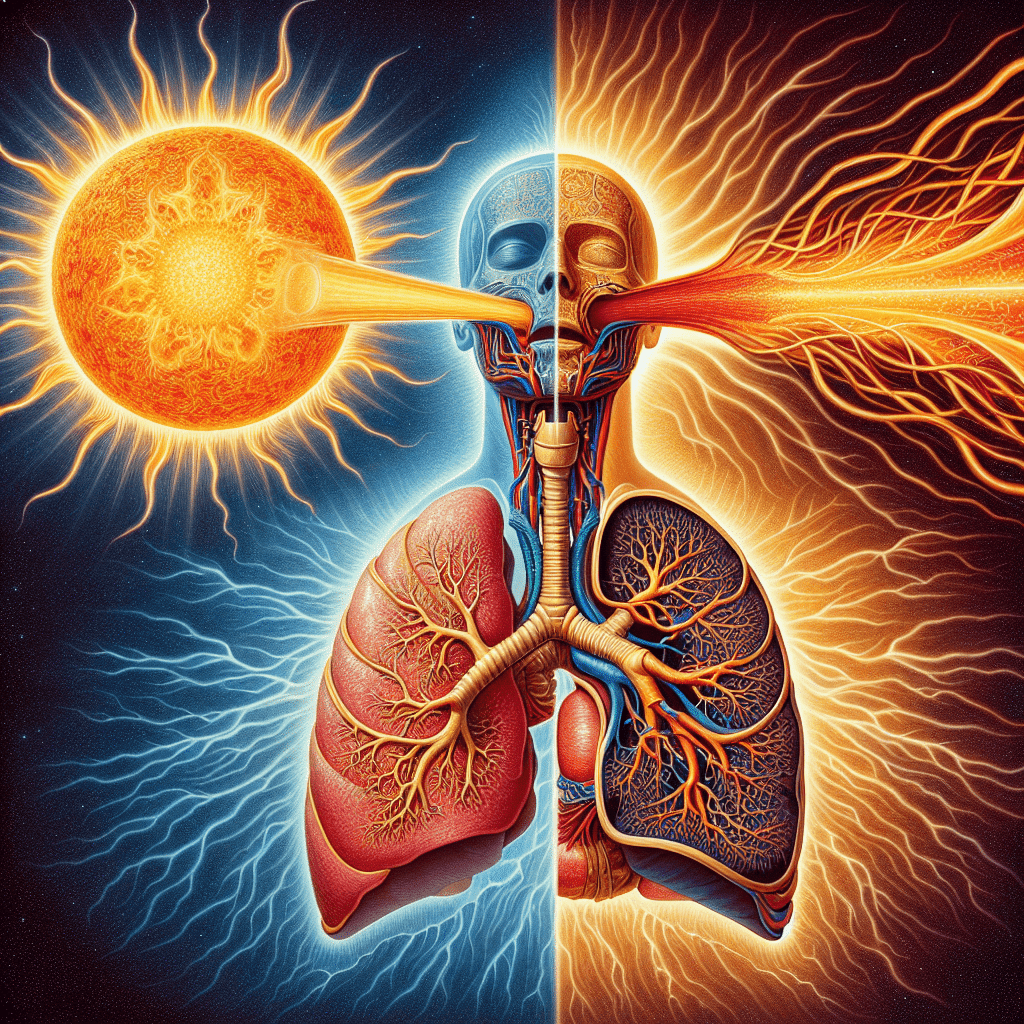
Artiphoria.ai AI generated image

To sustain life, a body must produce sufficient energy through aspiration. Breathing is perhaps the only system of the body that is both autonomic and conscious depending completely on the awareness and focus of the breather.

Breathing through the nose, all the time, is part of the true yogi’s path. I can remember 6 months into practicing yoga, I attained the ability to breathe through my nose and it complete changed my yoga practice and my life. I got hooked on the feeling of yoga (call it a healthy addiction) and never looked back.

In Yoga, the energy of breath is called prana (प्राण, prāṇa) which can be described as solar wind in the atmosphere, or liquid light[6]. Through ventilated aspiration, the yogi ingests the prana into the nervous system. In Hindu literature, Prana is described as originating from the Sun and connecting the elements through the Chakras of the human nervous system and conscious awareness.

Yousun Koh

The nervous system is completely dependent on your breathing to function: The parasympathetic system slows your breathing rate. It causes your bronchial tubes to narrow and the pulmonary blood vessels to widen. The sympathetic system increases your breathing rate. It makes your bronchial tubes widen and the pulmonary blood vessels narrow.[4] This process of is also known as the “fight or flight” response. This happens through ventilation, or respiration as the body mobilizes itself to a threat. However, this system is over-active in our cultures because of our stress responses to non-life threatening stimuli. It is healthier for a human to regularly breathe through the nose.

The Nasal Cavity

“The function of the nasal cavity is to warm, moisturize, and filter air entering the body before it reaches the lungs.[1]” Here are the additional benefits:

Nose breathing is beneficial primarily because it allows your nasal cavities to:[2]

msdmanuals.com/home/lung-and-airway-disorders
  • reduce exposure to foreign substances.
  • humidify and warm inhaled air.
  • increase air flow to arteries, veins, and nerves.
  • increase oxygen uptake and circulation.
  • slow down heart rate.[3]
  • improve lung volume.
  • help your diaphragm work properly.

In essence, hairs and mucus lining the nasal cavity help to trap dust, mold, pollen and other environmental contaminants before they can reach the inner portions of the body and the lung’s organic tissue. Air exiting the body through the nose returns moisture and heat to the nasal cavity before being exhaled into the environment.[1] The mouth, also known as the oral cavity, is the secondary external opening for the respiratory tract. The mouth is mostly for filtering in eating and drinking.

Oblique muscles (accessory breathing muscles)

Focus on the Exhale

Nasal exhalations are an extremely important focus in yoga. The muscles in your chest and abdomen tighten or contract to create a slight vacuum around the lungs. This causes air to flow in. When you exhale, the muscles relax and the lungs deflate on their own, much like an elastic balloon will deflate if left open to the air. The lungs are extremely flexible sacks of tissue that have the ability to expand and contract.

References:
Yousun Koh
  1. InnerBody.com
  2. Dentallogictruro
  3. YogaU Online
  4. National Institute of Health (Govt)
  5. Himalaya Institute – science of breath
  6. NASA – Solar Wind
  7. kenhub.com
  8. Sivananda

The Anatomy of Breath: A Yogi’s Guide Read More »

Henry Gray – the Father of modern anatomy

By H. Pollock - [1] [2], CC BY 4.0, https://commons.wikimedia.org/w/index.php?curid=1458730

Henry Gray was an innovator and disruptor in the medical field with his surgically precise incisions and methodically meticulous explorations of the human anatomy. I love his work and have used the depictions from his book for much of my anatomy articles due to their lack of copyright.

Gray was born in Belgravia, London in 1827 and spent most of his life in London.

His book on human anatomy, Gray’s Anatomy, is still regarded as the anatomical bible of the scientific world. He was extremely precise and through his experience making painstakingly exact incisions and methodically mapping the physical anatomy of the human body. While still a student, Gray received the triennial prize of Royal College of Surgeons for his essay The Origin, Connexions and Distribution of nerves to the human eye and its appendages, illustrated by comparative dissections of the eye in other vertebrate animals.

The following year, at the age of 25, Gray won another prize for his essay on the Spleen(this is a fascinating read when you have time), and was elected a fellow of the Royal Society.

In 1858, Gray Published his first anatomy book of 750 pages and hundreds of figures by his friend Henry Vandyke Carter. They met at St. George’s School of Medicine. At first, when Gray wrote his essay on the spleen, Carter thought Gray was a snob. Over time and as they worked together more their respect for each other grew, largely due to their seriousness and commitment to the field of medicine. Initial conflict occurred with respect to the payment that Carter received from Gray for his designs, being in need of money, and that he judged inadequate for his commitment.[5]

The images from these two scientific heroes are timeless. And luckily for me, they are copyright free due to their age and remain some of the most powerful anatomical depictions. I use many of them in my anatomical articles on this website.

Henry Gray’s Death

Gray was struck by attack of confluent smallpox, a most deadly kind of disease. On 13 June 1861, the day he was to appear for an interview as a final candidate for a prestigious post at the St. George’s Hospital, he died at the age of 34.[3] He was buried at Highgate Cemetery.[4][5] Gray had been vaccinated against smallpox as a child with one of the early forms of the vaccine.[6]

He is assumed to have been infected due to his passionate care giving for his ten-year-old nephew, Charles Gray, who did recovered from the deadly disease.

The Style of the Book

had a major influence on science that has since but irreplaceable. It is reminiscent of the evolution of art from Classicism to Hellenism in Ancient Greek art, throughout the Renaissance and afterwards, in that the accurate and precise portrayal of the human form was the primary goal. Read more about the stylistic evolution of anatomy here.

You can buy a cool version of Gray’s Anatomy Here.
References:
  1. Henry Gray’s Anatomy of the Human Body
  2. Henry Gray on the Structure and Use of the Spleen
  3. Henry Gray Wikipedia Page
  4. Vandyke Carter (Henry) Wikipedia Page
  5. Royal Society Wikipedia PageRoyal Society Website
  6. The Making of Gray’s Anatomy
  7. Internet Archive of Gray’s Anatomy
  8. Style and Non-style in Anatomical Illustration

Henry Gray – the Father of modern anatomy Read More »

Elliot's Backpacking Trip through Yellowstone National Park

10 Days and 9 Nights Journeying through Yellowstone National Park’s Back Country

Elliot’s Yellowstone Adventure Overview

When I first arrived in Cody, Wyoming I was hoping that I would be able to spend about a week in Yellowstone National Park backpacking through the wilderness. I did some research before on bear safety and precautions and had spent a good amount of time and money gearing up and preparing.

The idea was to start learning how to cope with snow while camping. Also to have my longest backpacking adventure yet. Though I didn’t get the mild snowy weather I was hoping for, I did get quite a challenging adventure logistically and mentally.

Every night was very different, ranging from anxiety about bear activity, to lack of sleep due to Elk and Moose trumpeting, to sleeping soundly in Yellowstone’s very fun and beautiful campgrounds of which the Madison area was my favorite.

Another big goal was to see lots of wildlife while staying safe. Yellowstone has the highest concentration of mammals in the lower 48 United States (Alaska has more) and I am a large animal enthusiast. It turned out to be a great time and I really started to get the hang of being out there about 5 days into the adventure.

The second day in Cody, I made a friend named Josh, who I met at Sunlight Sports on the Main Street Sheridan Avenue. Josh is becoming a really good climber and we got another chance to climb after this and also went bouldering with some local dudes that were super talented on the local bouldering routes up on Cedar Mountain. We went sports climbing a day later and I asked him if he could give me a ride to the park for some gas money. He agreed, so I found a small storage unit and put all of the climbing gear and things that I didn’t think that I would need backing into it. Tuesday morning I headed into the park with Josh as my driver.

I later sent a 5.10c on lead and am super psyched on it even though I topped out like a beached whale cause my arms had literally no strength left in them at the top.

Part 1 – Acclimatizing to Living in Nature

Day 1 – Into the park and the Yellowstone Lake Backwoods

can you see the grizzly bear’s shoulder hump in the photo?

Josh dropped me off at about 9am at the East Entrance to Yellowstone State Park. I paid the $20 for personal entry to the park and started walking. The first day was spent mostly hoofing it alongside the road. Yellowstone isn’t exactly the most pedestrian friendly place in the world and focuses far more on road maintenance than keeping up its trails. However, this setup does allow for easy and effectively managed wildlife viewing, so I definitely have mixed feelings about it. I saw my first Grizzly bear about 3 hours into the first day, at about 11:30am whilst walking along the road. A photographer up ahead of me had a massive camera and we chatted for about 30 minutes about the bear’s activity. The photographer was full of useful information and had followed the bear the previous season, as well as earlier in the week. It was a very interesting beginning to a very long day.

Sylvan River Sulfur Spring

After 15 miles or so of hiking it along the road and having people waving at me from both directions, I left the road from the East Entrance. At about 3:30 (plenty of daylight to get to the lake, or so I thought…) I followed the Sylvan River down into the back country where I enjoyed the nature far more than the vehicles (many of them were RVs). I found this fascinating sulfur spring pouring into the river and decided to pump my water far upstream from it, where the water was much clearer. I wasn’t and still am not sure if my filter would be effective against such a smelly and toxic looking thermophile deposit, but it seemed to do fine with the trace amounts that must have been in the river. I continued down stream, leaving the river at points because the back country travel was so difficult. I was bush-whacking over large and stacked pine trees and began to see lots of animal sign, scat and tracks. I knew to make noise and avoid being smelled and I had all of my bear equipment at the ready, but I still became very fearful of animal activity and interest in me as the day progressed. I really felt that an animal might get curious and approach me. But the sun was going down the horizon and it was getting super cold. I setup my pack and bear canister far away from my site and waited to cook until the following day to stay hidden from the bear’s incredible sense of smell. Additionally, the sulfur deposits leeching into the river would protect against something smelling me or my pack. I settled down into the hardest night of sleep while in the park, worried that a bear might smell and/or interested in my campsite.

Sunrise of Day 2

I had a hard time sleeping that night, but my dreams were incredible. It probably took me 1-3 hours to get to sleep each night and this was for sure the longest it took me whilst in the park. My first dream was about a bear attacking me, jumping on my back while I was in my tent. Surprisingly, this put me at ease, allowing me to find some peace with where I was and the situation. I let go. The night passed and I awoke to a hard frost, but no signs of animal activity near me. I had made the mistake of leaving all of my sweaty clothing out (away from my tent) and it had all frozen over. Next time I would keep my wet clothes in my tent to avoid that situation happening again. I waited for the sun to rise above the ridge-line of the valley that I had slept in and warmed up with my gloves and some backpacker’s pantry oatmeal for breakfast as well as the Instant Coffee I bought from Pour Choice in Auburn, CA for this exact adventure.

Day 2 – Getting to Yellowstone Lake and Hitching my First Ride

The morning of the first was by far the hardest hiking I had to do. Two miles took me two hours and it took 5 to get to the lake. I attempted to follow the Sylvan river, but it was extremely slow going due to the downed trees, most likely from the flooding earlier in the season. Luckily my trekking poles came in very handy to effectively help me to cross over many of the larger stacked trees, but I still had to find my way through the maze. Sometimes I had to literally go backwards a bunch and find a new path forward. It took all morning and just a bit of the afternoon to reach the lake, which I had planned on staying at the first night.

My first view of the lake was spectacular, both in feeling and beauty. My stress levels diminished quite rapidly as I soaked my worn out feet in the lake, which were being gradually destroyed by my new Arc’teryx Acrux mountaineering boots that were not yet broken in. And I realized I had forgotten my favorite shoes, my Choco’s sandals, in my temporary storage unit back in Cody. I swam a bit in the icy cold water and then continued barefoot up to the road, where there was signage and all kinds of warning about bear activity in the area. I knew I was pretty lucky not to have encountered any wildlife other than squirrels and birds so far so I decided to recuperate and plan the next part of my trip outside of the lake area that I had originally planned to stay in for the duration of my backpacking trip to Yellowstone.

I hiked up to Sedge Bay and Steamboat Point picnic areas and met a really friendly Canadian couple who were traveling through the park with their car (like a normal person would). I asked for a ride and they graciously offered to bring me north, to Canyon Junction where they were staying at the expensive and beautiful Canyon Lodge.

We traveled for a few hours and roamed around the park, seeing Bison, checking out geysers, and learning about the conservation efforts of the park. I pretty much just went along with whatever they wanted to do, happy to not be alone in back country any longer. All the time we spent seeing the sights, I was wondering where I would stay the following night. At this point I learned that its really not allowed to just stay in the back country (even though I had previously signed up for a back country permit) and that you were supposed to stay in specific campgrounds throughout the park. But due to the off-season closures, I had a terribly hard time finding rangers to give me advice or any sort of guideance.

Once we arrived at Canyon Village, I talked to the very nice, however uninformative receptionist at the hotel, who explained that only one campground was really still open (actually there were two) and that it was on the Western end of the park, the Madison campgrounds. I was wary of staying in the back country for another night and didn’t have any idea of how I could get there, especially at the late hour that it was, around 6 o’clock. When I’m backpacking I definitely prefer to have my tent setup before dark. And Canyon Village had campgrounds, although they were closed for the season, even though the weather was still very agreeable. I got a hot plate for dinner, rice and chicken and veggies and then followed the Canyon Village road to the closed campground area.

I decided to stay just off the campgrounds in the forest around some trees that looked very healthy. I slept really well that night, but the dreams were still extremely vivid. And I could hear wolves and coyotes howling that night, which made for some interesting thoughts. Overall one of my good nights overall, getting to have a hot meal and feeling safe my camping area.

Day 3 – The Wild Greeble Lake

I woke up on the third day to the cold. The mornings were definitely a big temperature difference from the nights, so I would layer up in the mornings and then take off clothes as I started to sweat, doing my best to avoid moisture buildup in any of the layers.

I had studied a back country path out to the Cascade and Greeble Lake area so I got on the road early to find the trail. I got to the trailhead and began towards the lake, an easy hike for about 3 miles. Once I got there, the views were magnificent; this was the type of camping and backpacking that I had been looking for in the park. I passed a back country campground that allowed for fires and started to get super psyched to spend the night out there. I met three hikers along the trail and we chatted a bit about bear safety, they seemed to be very interested in my larger backpack so I was happy to chat and tell them about what I was doing out there.

I found an open site on Greeble Lake (some were closed due to wildlife activity) and setup my tent. It was only about 4pm so I went for a swim in the icy lake and got a fire going, cooked some dinner (actually my least favorite meal, New England corn chowder) and dried off some of my clothes, still wet from the first night’s hard frost.

Greeble Lake Fog

Pretty much as soon as the Sun went down, I heard loud trumpeting right next to my tent. And then swimming. The elk were for sure going out into the lake to swim and several of them were calling for mates. It was actually quite symphonic, they were beautifully calling out in the night and the moon was pretty full so I’m sure those elk were having the time of their lives out in the lake. Partially through the night, I heard a more distinctly large and deep animal trumpeting sound, that was more chaotic and louder. I’m pretty sure this was a moose, cause it came back to an area near my tent and started making tons of noise. I didn’t sleep so well that night, but it was so fantastic that I didn’t mind the next day. The dreams I had that night were the most vivid of the whole trip.

Day 4 – Arriving in Norris and Madison

The next day I awoke to no animal movement except for the little mallards on the lake. I woke up a bit later to get the sleep I knew I needed and to let the Sun warm up the fog from the lake. I pumped water, ate some breakfast and got on my way.

I passed Wolf and Ice Lake fairly early in the day and got out to Norris, where my trail disappeared into a giant meadow, with no landmarks in sight. I was completely lost for about an hour and heading into the direction I knew the road would be in. I trudged through the thick sedge grass in the meadow and followed power lines out to the road at Norris and the main road. Once I was on the road I decided to check out the Geyser basin. It did not disappoint, Norris has the most dynamic thermal activity in the park and is constantly changing. I spent about an hour exploring there, ate a little, then began to walk down the road to the Madison Campground.

At this point my feet were pretty destroyed, it was the first time I had worn my boots and I didn’t have a send pair of shoes to trade out. I was moving too slowly to get to Madison before nightfall so I decided to throw up my thumb and try to get my second ride of the trip. Probably 200 cars passed me before a truck stopped pretty far ahead, it looked like the guy who stopped was reorganizing his trunk space. I confirmed that he was going to give me a ride and a feeling of relief washed over me.

The next 15 miles took about 20 minutes rather than a whole day. Nate and his family of four, two younger boys, were my miracle that day, giving me lots of snacks and food to continue on with my back country adventure. They had previously traveled around Shoshone Lake and I figured that would be a good place to spend a night or two.

I got into the campground, tired and hungry and went to the local store to buy as much food as I could eat that night, including bacon, instant noodles, and BBQ style kettle chips.

I was getting my fire setup to cook the bacon when my Irish neighbors came over with some Bourbon whiskey to share!

These two gentlemen were from Ireland doing the continental divide trail on bike and were also looking to take a day and rest (I had covered quite a lot of distance in the past 3 days and needed to rest my feet from the heavy boots). We became friends quickly and began to tell of our lives back home, Tommy was a poet and Dermot, well I’m not too sure about Dermot’s story but he had traveled a lot and continued to love living in Ireland. We decided that the following day we would go fishing and take it easy at the campground, as it was one of the few places with accessible food. The rest of the park seemed to be completely shut-down for the season.

Day 5 – Fishing in Madison

I slept like a little baby that night, the bourbon kept me plenty warm and I was very happy to have a couple of friends to share time with. Tommy and I woke up late and went out to the river to fly fish and we spent the day exploring different flies and trying to entice the fish to our reel to no avail. Tommy had previously gotten his fishing license and I was happy to learn all about the conservation efforts for the local species of cutthroat trout. In fact, if you catch a bass in Yellowstone you are required to kill it. They are very intelligent about how they want to preserve native species in the park, I recommend checking out the rules simply because they are so interesting.

We came back to camp and had a couple of beers together and cooked some more bacon, I was definitely trying to eat as much fat as I could over those two days in Madison. And again I went to sleep a happy camper.

Part 2: Mental Acclimatization

Day 6 – Faerie Falls

The next day I woke up and packed up all my things, ready to try taping up my toes to keep them from forming more blisters from my boots. It worked out okay, but the first part of that day was still extremely difficult. The pain in my feet just didn’t seem to alleviate for any reason, no matter how I changed my walking technique. Eventually I found that stepping with my heels first was the only way to keep my toes from exploding with pain. I would use this type of walking technique for the rest of the trip, which definitely slowed down my pace.

The Madison River area turned out to be one of my absolute favorite places in the park. It was beautiful, everyone was friendly, and the fishing was really good. I could see myself going back during the summer months to stay for a couple of week and just follow the river and fish.

I got to following the Firehole River in the morning, which drains south from the Madison Junction. There was a beautiful waterfall feature as well as massive cascades, so I spent some time just following the water and ate a solid lunch sandwich from the Madison Campground area.

I got back onto the trail from the fountain flat drive where I saw herds of buffalo roaming around the Western side of the park. They seem to love the thermal features, even when it is hot out. Whilst on the trail, I saw a buffalo that was really close, but seemed to pay no mind to me. I knew these were the most dangerous animals in the park so I kept as much distances as I could between myself and these absolute units of pure muscle.

Bison that is too close for Comfort

Further down the Faerie Falls trail, which was spectacular, a group of about 4 bison herded together and were about 130 yards away from me. One of the bison stared me down from the side of his eye, looking at me like I was a wolf or some other predator. It stomped its hooves at me and began to paw the ground towards me. I hunched my shoulders and looked away to show that I wasn’t a threat and simply. continued along the trail. Another bison stepped in between myself and the aggro male, probably a female calming her mate, and I simply walk away into the distance.

I walked a fair distance to the Faerie Falls waterfall, which is so beautiful, and met German couple who were celebrating their halfway point through medical school. Their English was very good and we got along great until I split from the trail to head to my campsite for that night. I slept in the forest that night, entranced by the beauty I had been able to enjoy that day.

Slow motion capture of low water flow of Faerie Falls

Day 7 – The end of the Faerie Trails and Old Faithful

I woke up to the sounds of baby birds and squirrels in the trees. Packed up camp and got ready for the next leg of my adventure. I was just starting to run low on food and gas so I knew that I would have to get to a store soon. I left the forest campground and headed back into the plains, where there were lots of tourists exploring the thermal features just north of Old Faithful.

I enjoyed walking along the decks by all kinds of amazingly unique natural wonders heading down to the national monument that I had visited once before with my friends from college. I got into the visitor area and talked with the rangers about where the southward back country campsites were and got a fishing permit and fly fishing rod to go out and have some fun in the rivers and lakes. I was running out of butane so I also grabbed some gas and bought a few food items, but they didn’t have any of the freeze dried meals that I knew I would need in the back country. I also had my first cheeseburger of the trip, which was just ok. I get spoiled by the incredibly good food in California.

I continued out of the highly trafficked area to get back into the back country and took the Howard Eaton trail down to the first back country campsite along the Firehole River, which had lots of thermal activity. I decided against a fire that night and setup my camp site as the sun dropped below the horizon. I was ready to get back into the sticks and see some more wildlife and nature and beautiful unique thermal features that Yellowstone is known for.

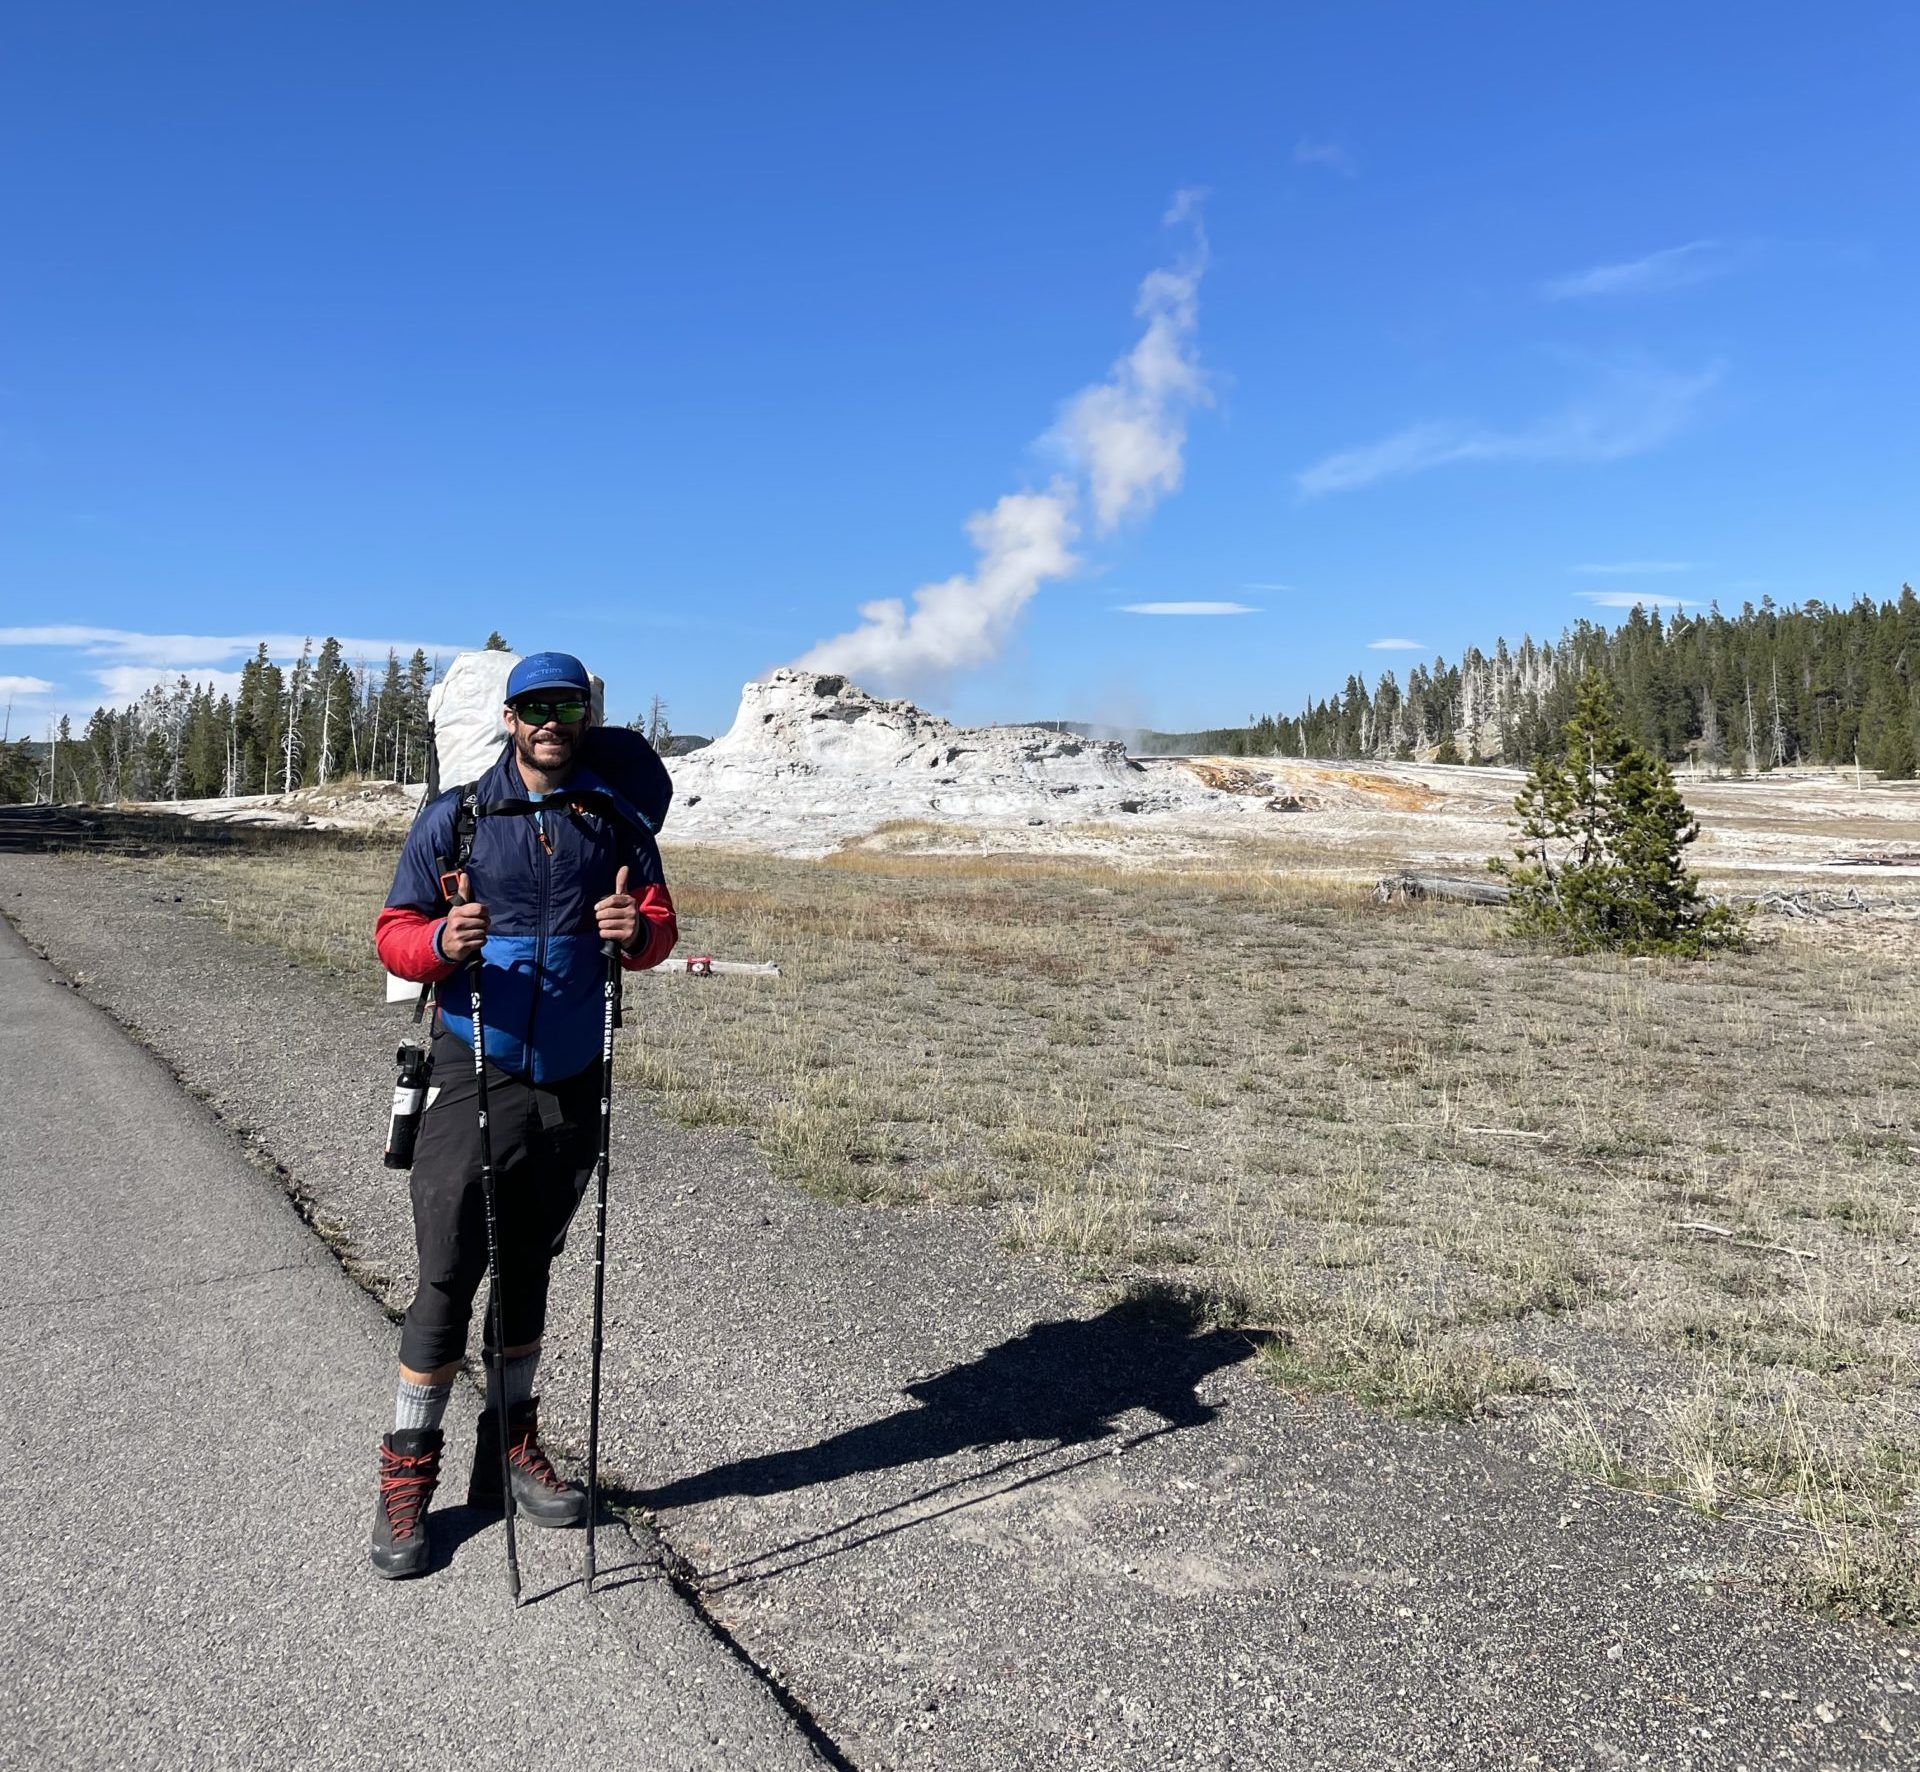
Castle Geyser

Day 8 – Shoshone Lake 1

I woke up a little late as I usually like to when its really cold out and packed up all of my things and made breakfast, which was usually instant coffee and a backpacker meal. I realized I only had one breakfast left and I cursed myself for not getting more food at Old Faithful. I had been too focused on getting fishing going for myself and idealizing about catching and eating a fish while I was out. I got going onto the trail heading south to Shoshone lake and figured I would just go as far as I could.

Shoshone Lake Sunset

My feet were finally feeling a lot better; I had bought moleskins, Neosporin, and blister medic kits at Old Faithful so I was completely ready to start experimenting with the optimal way to keep my feet from re-blistering. I walked along the Shoshone Lake trail for a long time until reaching the area that forks north. I surveyed several campground that didn’t allow for a fire, which greatly disappointed me because I was hoping to catch and cook a lake trout!

I continued on for about 15 miles that day which I was very happy with due to the state of my feet. I got to the northern campsites of the lake at dusk and setup my tent and 0 degree sleeping bag and that night I slept great. I was used to the trumpeting elk and got through the whole night without waking up too much. There were lots of sounds throughout the night, but I think I just got really used to them.

Day 9 – Shoshone Lake 2

I woke up happy and ready to start fishing, I had setup my pole the night before was stoked to get to lake fishing. However, in Old Faithful I purchased a fly fishing rod which is definitely used to running water and not the still water of a lake. I fished for about 2 hours, took a desperately needed bath and pumped water to get ready for another day of walking, all day long.

Shoshone Lake, Yellowstone National Park

I got about a half a mile further along the trail when I discovered a couple of park rangers that were assessing the back country campsites along Shoshone Lake. I stopped to talk to get as much information about the area as I could and was told that Lewis Lake Campground was still open and that there was a store down there. I was stoked! I needed to get more food and it would be so nice to be around other people again; I thought maybe Tommy and Dermot would still be there, as they had planned for two nights camping in Lewis Lake…maybe they would stay for a third?

I headed down the Delacy Creek Trail by the river and made excellent time heading down to Lewis Lake. I had started the day late due to fishing and bathing so I hadn’t met the rangers until about noon. I got to the DogsHead Trailhead and went east until the road, where I walked down to Lewis Lake Campground.

I got to the ranger station and they had several reserved, but unused, campgrounds. I guess there are some reserved for hikers and bikers there, but she sent me to a regular campground that can house up to 6 people. But there was no store! And no way of getting more food for that matter. I was pissed! Both at myself for listening to the rangers and at the campground for not having at least granola or chocolate bars to sell. It just seemed so silly to me to have a remote campground that didn’t sell food.

I was down to two back country meals, Mushroom Stroganoff (which is delicious, highly recommend) and Green Curry. Sleep that night came easily, but with the stress of knowing that the time had come to leave the park. I had exhausted my resources and my mental energy and I was ready to head back out to Cody. And I knew that getting out of the park, I would need as much luck as I could get.

Day 10 – Lewis Campground and Exiting Yellowstone Park

In the morning I woke up rather early, I was planning on fishing again to see if I couldn’t catch something awesome to keep me fed for another day. I packed up my stuff and headed to the restroom where I met a guy named John, who was traveling through the area with a supped up Jeep. We chatted for a minute (I let him use the bathroom first because I was in no rush) and I learned that he was from Sacramento! I told him about my situation, how I had arrived at the campground to find no store and no way of buying more food and he took me back to his camp site and fed me!

John and his wife (whose name I do not remember) was literally one of the nicest people I have ever met. They made me hash browns, eggs, and bacon and we enjoyed stories about their own backpacking trips through Desolation Wilderness, an area just outside of Lake Tahoe that I also love to spend time in. They also got me some backpacker meals and snacks to take with me, for which I will always be grateful. What an amazing twist of events from the night before! I asked John if he wouldn’t mind giving me a drive to West Thumb and he happily took me to the gas station there, which was only open for gas.

I went to the ranger station in West thumb to see about additional campsites, but they were all at the southern end of Yellowstone Lake, pretty far into the back country. However I still reserved a campsite for that night, just in case I couldn’t find a ride out of the park to Cody, I might as well have a decent place to sleep that wasn’t off the trail.

I got out of West Thumb after checking out the geysers, which in my opinion weren’t even close to as interested as the Norris Geyser Basin or the area north of Old Faithful and managed to hitch a ride to fishing bridge with a Mexican dude that lives in San Francisco. He was super nice and gave me a Blue Moon on the road, and we chatted about how great the wilderness was.

I continued down the road from fishing bridge and kept my thumb up, hoping that someone heading to Cody, WY wouldn’t mind picking me up. About 20 minutes later, Allen (same name as my dad, different spelling though) who is a Scottish man living in New Zealand and Perth, Australia picked me up. We drove about 10 minutes just talking when we saw a commotion on the side of the road.

There were two bears up on the side of a mountain foraging for food with a huge crowd of people watching them and taking pictures of their every move. The bears seemed not to care at all and rangers were watching the people very closely to make sure they didn’t do anything stupid.

I had a good chat with two of the rangers about the bears and how they manage them and apparently there is a little less than one bear attack a year, which in my opinion is really good. I guess there were 3 bison attacks earlier this year from people getting too close. Anyways, Allen and I got some great photos of the bears and then continued on our way back to Cody, where we had a couple of drinks. Then Allan took me to the end of the South Fork Road where the water ice forms that I came to Cody to watch and we marveled at the beautiful, but barren mountains. I really hope I get to see some of those infamous south fork pillars form this year, but I won’t see them on this trip due to the unusually hot October weather. Allan will always have my gratitude for taking me about 100 miles out of the park, he was a really fun and nice guy to hang out with for a day.

In Conlusion

This concludes my journey through Yellowstone. Huge shouts out to the people that helped me to get from place to place, I definitely would have suffered a lot more without them! John, Allan, Tommy, Dermot, Crissy, Terri, Isabelle, and Alex, and of course Josh, I really really appreciate your kindness and it will not go forgotten.

The Gear Reviews

10 Days and 9 Nights Journeying through Yellowstone National Park’s Back Country Read More »

The Abdominal Wall and Attraction to Potential Partners

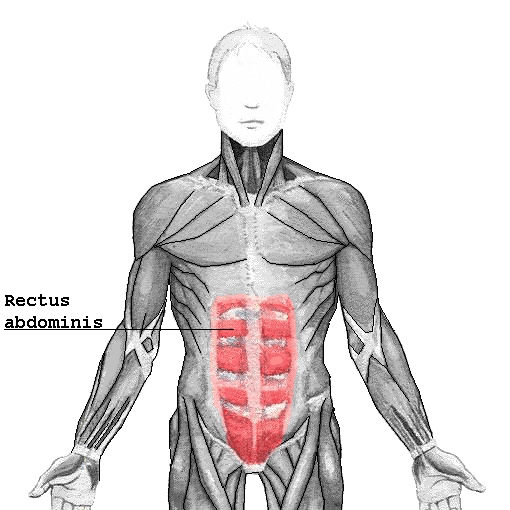
Have you ever been at the gym doing crunches and planks with your buddies and had no idea what you were doing? When you start talking about what you are working out, you are discussing abs, or abdominal exercises. Most often what we are talking about when working out or exercising is the rectus abdominis muscle via crunches and leg ups or even planking. This muscle becomes more visible as body fat percentage lowers and is sought after each New Year by men everywhere, only to remain illusive due to its dietary requirements (it has more to do with body fat with muscular strength). You may think this is the sole perpose for a man’s existence, but it is not.

The abdominal region is far more complex than one muscle. The abdomen, or lower thorax contains severals layers of muscular tissue that interweave to hold your organs in place and keep your spine upright so you can walk. These muscle tissues interweave to form the necessary support for an upright spinal column. I’ll talk more about the “6-pack” rectus abdominis muscle in a moment.

Obliques, Ribs, and Organs

abdominal 2 (GRAY)

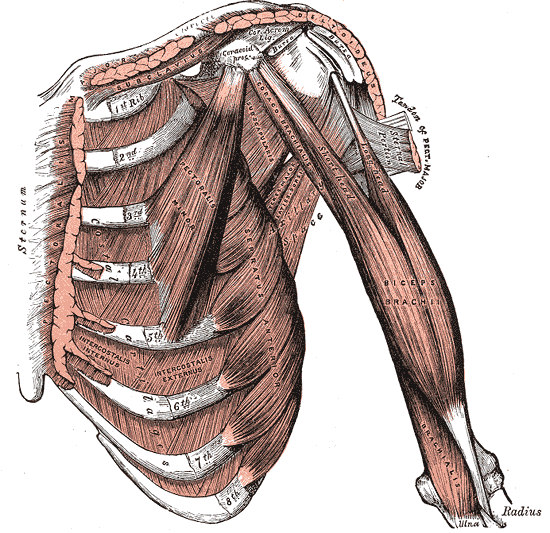
The ribs are an often forgotten power center for posture within the body. They contain several muscular connections to bones and tissue around them. They do this to take tension from the spine by using accessory muscles. There is a massive connection between the accessory muscles and the diaphragm. These acessory muscles help us to breathe.

The Three Forgotten Abdominal Muscles

They are the internal and external obliques, which means diagonal and the transverse abdominis These muscles are responsible for the wall of muscle tissue underneath the rectus abdominis. These are all abdominal muscles. Together they muscles support the lower back and the organs of the thorax (chest cavity).

The Pyramidalis muscle, Linea Alba, and Hip Flexors (more forgotten abdominal muscles)

The pyramidalis is another abdominal muscle connects to the pelvis in two places (this is the V at the bottom of the rectus abdominis. It inserts into the linea alba via a pointed connection halfway between the belly button and the pubic bone. The linea alba is the fibrous muscle that runs up the center of the abdomen. It inserts into the diploid process at the bottom of the sternum. The linea alba is compose mostly of white collagen connective tissue. Linea Alba means “white line” in Latin.

The hips flexors and perineum are two more important muscle groups. The muscles create support for the back in concert with the abdominals. The hip flexors, in particular, have a huge amount of interaction with the spine. The hip bones connect the abdominals and the ribs .

Female Type Pelvis
Male Type Pelvis

Back onto the ‘6 Pack Abdominal Muscles”

The rectus abdominis is the top layer of muscle tissue visible and is the most common sought after muscle for looks. It is thought to provide an indication of health for prospective mates, but I wasn’t able to find any evidence for this assertion.

There is a surprisingly giant gap in the research when it comes to research about the attraction of the opposite sex. Statistically speaking, men value physical attractiveness more than women and women value similarities more than physical attraction. If you are overweight, you are more likely to be attracted to overweight members of the opposite sex.

One final, very interesting finding is that men are more attracted to novelty, and women to familiarity (read the article).

More and more evidence is arising that attraction is genetic. First, Behavior does not create homosexuality. It occurs natually and is genetic. Second, in our courtship of partners, we seek similar genetics to our own. Add social influences that help to determine what we find attractive, including fashion, perceptions of success, etc on top of these biological factors. Dive into the research. See for yourself.

Conclusion: Advice for Stretching the Spine

You can see how connected the muscles of the abdomen are with the hip flexors, ribs, spine, and diaphragm and how all of these muscles work together to create posture. All of these muscles are responsible for the health of the spine and in many ways the organ tissue in the thorax (stomach, kidneys, etc). Make sure you stretch your legs and hips to really get your spine mobile and strong!

I’ll do a separate article on the hip flexors next week. And visit again soon! You can subscribe to get an email update every time I publish an article.

References:

  1. Sex Differences in Attraction to Familiar and Unfamiliar Opposite-Sex Faces: Men Prefer Novelty and Women Prefer Familiarity (https://link.springer.com/article/10.1007/s10508-013-0120-2)
  2. On the Fashionable Sexiness in Aesthetics (https://www.ijac.org.uk/images/frontImages/gallery/Vol._3_No._4/2.pdf)

The Abdominal Wall and Attraction to Potential Partners Read More »

grays_shoulder_anterior

Human Shoulder Anatomy and Physiology

There are 3 bones in the human shoulder, or glenohumeral joint; the humerus, the clavicle, and the scapula. These bones are stabilized by 15+ muscles, depending on how you count them. These muscles function to stabilize the joint. This is what allows you to type, swing, and grasp with utter precision. Homo sapiens shoulder is precisely mobile, but lacks the stability and strength of our great ape cousins.

Gray's Shoulder Joint Depiction
Gray’s Anatomy

The muscles and bones of the shoulder joint work very closely together. They are very often depicted together in anatomy books because of how they functional in unison. The human shoulder joint is nothing short of incredible as a feat of natural evolution. It is a major evolutionary advantage over our primate cousins. Human beings the ability to climb, sprint, and perhaps most incredibly to throw objects accurately over large distances in conjunction with the excellent eye-sight of homo-sapiens sapiens because of our shoulders. And we can still climb, but must use our legs dominantly.

The Clavicle and Scapula are both considered to be part of the shoulder girdle, the structure that supports the appendages of the upper body. The shoulder provides stability for the neck, or upper third of the spine.

Bones of the Shoulder

Humerus

Scapula – wing bone, or blade bone connects the humerus and clavicle and lies on the back of the rib cage. The name derives from early Roman times when it was thought that the bone resembled a trowel or small shovel.

Humerus – the humerus is a long bone of the shoulder joint, connecting the shoulder girdle to the forearm.

Clavicle – also known as the ‘collarbone’, it is the first bone to ossify in an embryo, and connects the sternum to the scapula. It rotates upon its axis like a key when the shoulder is abducted. It is also the most commonly fractured bone.

Tendons and Ligaments of the Shoulder and Armpit

Gray's Shoulder Tendons

The Glenoid cavity is a shallow depression in the scapula, that connects to the head of the humerus and allows for the arm-bone’s articulation, forms the basis for the ball and socket joint and is held in place by the head of the biceps tendon. The rotator cuff also reinforces this joint with the supraspinatus tendon.

The Rotator Cuff consists of four primary tendons: the supraspinatus muscle, the infraspinatus muscle, the teres minor, and the subscapularis muscle. The tendons of these fours muscles merge to form the rotator cuff tendon.

The Coracoacromial ligament connects the coracoid process (the hook like structure on the shoulder blade) and the acromion (the highest profusion of the shoulder blade). This ligaments helps to shield the head of the humerus.

Gray's Rotator Cuff Ligaments

The AC Joint, or Acromioclavicular joint is the joint at the top of the shoulder that connects the acromion to the the collar-bones. There are several acromioclavicular ligaments as you can see in the image on the right and they are organized to provide added stability to the joint and to house the bursa and synovial fluid that allows the joint to articulate easily.

The conoid ligament connects the clavicle and the coracoid process further stabilizing the collar bone to the shoulder blade.

The caracohumeral ligament connects the coracoid process to the humerus.

Together, these ligaments stabilize and support the shoulder joint, allowing for the extreme mobility that we humans enjoy. However, the large amount of smaller ligaments and tendons sacrifice a certain amount of stability for this increased mobility and range of motion.

Shoulder Muscles

  1. Deltoid – responsible for lifting the arm and giving the shoulder its range of motion. Often this muscle is separated into 3 sub-muscles, anterior, lateral, and posterior as they are able to innervate separately.
  2. Teres Major – A small muscle that runs along the lateral border of the scapula and connect to the humerus.
  3. Teres Minor – extends laterally and obliquely from the head of the humerus to the scapula, underneath the Teres Major. This rotator cuff muscles rotates the head of the humerus and stabilized it as it moves in space.
  4. Supraspinatus – connects the scapula to the humerus and abducts the shoulder and arm.
  5. Infraspinatus – connects from the medial side of the scapula to the humerus to aid in stabilizing the shoulder. A thick layer of muscle on the outside of the shoulder blade and is the main external rotator of the shoulder.
  6. Subscapularis – Directly opposes the infraspinatus muscle on the interior of the shoulder blade. It rotates the humerus medially and adducts it, preventing the displacement of the humerus during motion.
  7. Serratus Anterior – originates on ribs one through eight and connects to the medial interior edge of the scapula. The serratus anterior muscles work in conjunction with the latissimus dorsi to lift the shoulder blades and pull them forward and are one of the primary core support structures for the shoulder. Shoulder injuries often occur in yoga because this muscle is not fully contracted, especially in Chaturanga.
  8. Subclavicus – A small muscles that lies between the clavicle and the first rib that draws the shoulders down and forward.
  9. Pectoralis Minor – a thin and flat muscle in the upper torso that lies underneath the pectorals major and originates in the second, third, and fourth ribs. (sometimes the 5th rib instead of the 4th). This is the primary chest muscle that assists in lifting the shoulders.
  10. Sternocleidomastoid – the primary visible neck muscle that rotates and turns the head and neck. It inserts at the sternum and clavicle and travels up to the mastoid at the temporal lobe of the skull.
  11. Levator Scapulae – the main function of this muscle is to lift the scapula, originates in the neck C1-C4 and travels down to the medial border of the scapula. Works in a state of near unison with the serratus anterior muscles.
  12. Rhomboid Major – connects the shoulder blade to T2-T5 of the mid spine. It is slightly deeper than the trapezius and slightly inferior to the rhomboid minor. Together with the serratus anterior and pectorals minor, it connects the shoulder blades to the rib cage.
  13. Rhomboid Minor – Also connects scapula to the spinal vertebrae, but superior (higher) than the rhomboid major and slightly smaller. Connects C7 and T1 to the shoulder blades. Oftentimes this muscle is completely fused with the Rhomboid major.
  14. Trapezius – a large paired surface muscle in the shape of a diamond, connecting the occipital lobe to the shoulder blades and travels down to the lower thoracic vertebrae. It helps to move the scapula and the arm. Because it connects both the spine and the shoulder blades, this muscle can be one of the primary causes of neck tension in the body.
  15. Latissimus Dorsi – a large flat muscle one the back that originates in the mid and lower back and travels all the way up to the head of the humerus. Is it the largest muscle in the upper body and is implicated for cardiac support and is also an accessory breathing muscle. Tightness in this muscle has been shown to be a primary contributor to back pain.
Gray's Brachial Plexus

Nerves of the Shoulder Joint

The Brachial Plexus is a network of nerve tissue that supplies the arm and shoulder with innervation. Branches of the plexus, in particular from C5-C6, supply the majority of the muscles of the shoulder. The plexus continues down the arm to form the radial, ulnar, and median nerves of the arm.

Blood Vessels of the Shoulder

The blood Vessels of the shoulder function very similarly to the nerves (often in the body, nerves and blood vessels run in parallel to make the innervation of the muscle tissue more accessible to the nervous system. The Auxiliary artery becomes the brachial artery at the upper arm and continues down the arm to become the radial and ulnar arteries. Most of the blood vessels of the shoulder branch off the auxiliary artery.

Rotation in the Shoulder

BursaShoulder bursitis is a common cause of shoulder pain and occurs when the rotator cuff tendons are impinged, or unable to articulate properly. The shoulder bursa is extremely important as it creates smooth range of motion for the arm and shoulder to travel.

Rotator Cuff – the rotator cuff tears are another common cause of shoulder pain, usually cause by a tear in the supraspinatus muscle.

Range of Motion – As I discussed earlier, the shoulder’s range of motion is largely allowed for by the tremendous amount of ligaments, tendons, and muscles that work together to mobilize the arm. This comes at the sacrifice of stability. The stability of the shoulder comes from the muscle tissue, which can limit the range of motion in the shoulder, which may be healthy for the skeleton, especially under large amount of duress. It is easy to see this limited range of motion in body builders, whose muscles have gotten large enough to impede the motion of the shoulder. An appropriate balance between stability and flexibility is what we are looking for in yoga (or at least I am looking for this balance) so that the joint can have maximum longevity.

All Referencing from Wikipedia.org

Images

Gray’s Book of Anatomy

Encyclopedia Britannica

Human Shoulder Anatomy and Physiology Read More »

nose breathing example

Nose Breathing & the Lungs

The Benefits of Nasal Breathing

Ventilation and The Sympathetic Nervous System

Breathing is a fundamental act of life. In humans, breath represents the gateway between the mind and the body. Also called ventilation, it is the first action we take when we are born, and the last before we die. The lungs are the primary mover of energy within the body; when stressed, the breathing rate elevates. Yogis and practitioners of meditation are particularly interested in breathing as a way of becoming more aware of the body.

Ideally, a yogi can breath in and out through their nostrils ceaselessly. Some people have physical limitations in their ability to do this, so as always, consideration must be taken the unique deviations of an individual skeleton. The physiological difference between breathing through your nose and through your mouth is tremendous. Clearing your nasal and air passageways can be a simple part of daily maintenance, or caring for the body’s optimal organic function. Yoga is the exercise of “stilling the mind” through the restricted the flow of breath. Using the nostrils is key to that restriction.

The “Energy” Organ

The lungs are the primary source of your energy level. They extract oxygen from the air we breathe primarily on the exhale. About 5% more of the oxygen in the air is extracted into our lungs when we exhale through the nostrils as well (air has been measure to enter ~21% and leave ~12% while breathing through the nose | ~21% and leaves at 16% through the mouth).

“When you exercise, carbon dioxide levels increase significantly which alert the chemoreceptors, which subsequently notify the brain’s respiratory center to increase the speed and depth of breathing. This elevated respiration rids the body of excess carbon dioxide and supplies the body with more oxygen, which are needed during aerobic exercise.” (Sarah Novotny and Len Kravitz, Ph.D, UNM, “The Science of Breathing”)

Nose Breathing and the Diaphragm

Because the nostrils are smaller then the mouth, air exhaled through the nose creates back flow of oxygen during the exhale. It slows the air escape so the lungs have more time to extract oxygen from them. They also increase the humidity of the air that travels into the lungs and Similar to closing the end of a teapot, breathing this way creates pressure in the diaphram and allows for a deeper exhale. A more complete exhale activates accessory breathing muscles to the fullest capacity which includes all of the abdominal muscles. All of this occurs muscularly while the sustained, increased oxygen level affect the muscles and nervous system regenerating it and allow the yogi to continue practicing. The key is slowing down the pacing so that the body can sustain its oxygen level.

Let’s look at the different parts of the anatomy involved with breathing.

Muscles involved with Breathing

  • Sternocleidomastoid
  • Scalenes (neck)
  • TrapeziusMuscles of Respiration
  • Latissimus Dorsi (upper back)
  • Pectoralis
  • Diaphragm – primary breathing muscle
  • Rectus
  • Internal Obliques
  • External Obliques
  • Transverse Abdominus
  • Serratus Muscles (ribs)
  • Illiocostalis
  • QL (lower back)
Thoracic Organs

The bottom of the diaphragm is extremely important as it separates the upper portion of the torso from the lower and assists in the ventilation process. This is key to understanding why full capacity respiration is so important to the human body. Most of the organs lie within the Thorax, or chest cavity, so the lungs have a very complex and interesting relationship to the rest of the organs, especially the organs of the digestive tract.

How your Lungs Affect your Organ Anatomy

Because the nostrils are smaller than the mouth, air exhaled through the nose creates a back flow of air (and oxygen) into the lungs. And because we exhale more slowly through the nose than we do though the mouth, the lungs have more time to extract oxygen from the air we’ve already taken in. This affects the vital nervous system connections to your lungs and heart. Not breathing well through your nose can alter your heart rate and blood pressure. It can also increase the intensity and frequency of the human stress response. Many researchers have said that mouth breathing can also be misdiagnosed as ADHD. This is why yoga can be extremely important and useful for children and to alleviate the negative aspects of stress response (cortisol release).

That about does it for the known effects of respiration through the nose, although I’m sure the benefits to the organs, specifically the digestive tract are understated. Share what you know below!

References:

  1. Physiopedia
  2. National Heart, Lung, and Blood Association
  3. Fitbit Blog- 3 Reasons
  4. IFL Science – Increase memory and Recall
  5. Science Direct – Article Aggregate
  6. Rhythm of Breathing Affects Emotions
  7. Pre-frontal and Mouth Breath
  8. Harvard Health
  9. Conscious Health

Nose Breathing & the Lungs Read More »

Femur

Femur Bone Anatomy: Pillars of Support for the Human Skeleton

Introducing the most Massive and Strong (in most ways) Bone in the Human Body

There are 62 bones in the legs: 10 trunk/hip bones, 14 ankle bones, and 38 foot bones. The femur (thigh) is the largest and strongest of these bones. Most land mammals capable of jumping also have femur bones, also lizards, frogs, and other tetrapod vertebrates. Its length on average is 26.74% of a person’s height, a ratio found in both men and women and most ethnicities with only restricted variation.

"80 - Pelvic bones with sacrum and femur" by Knowledge Collector is marked with Public Domain Mark 1.0. To view the terms, visit https://creativecommons.org/publicdomain/mark/1.0//?ref=openverse.

5 Interesting Femur Bone Statistics

  1. The femur is, on average, about 1/4 of a person’s height. It’s remarkably strong and can withstand forces of up to 1,800 to 2,500 pounds (800 to 1,100 kilograms) of pressure, making it one of the strongest bones in the body.
  2. The Femoral neck sits at a 125 degree angle
  3. Vehicular accidents are the primary cause of breakage
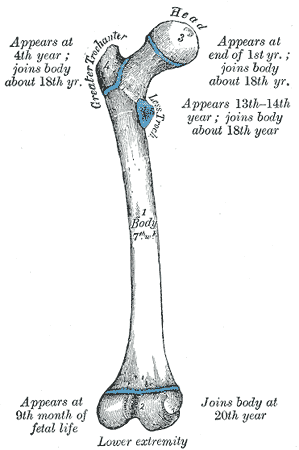
  4. During growth in childhood and adolescence, the proximal end of the femur (the femoral head) has a growth plate, known as the epiphyseal plate. This growth plate allows for longitudinal growth and helps determine a person’s final height when it closes.
  5. Forensic anthropologists often use the femur bone to estimate the age of an individual based on the degree of fusion of the epiphyseal plates, which can help in identifying human remains. It is heavily used in archaeology.

The Greater Trochantergreater_trochanter_grays

The Great Trochanter is a large, irregular, quadrilateral eminence on the upper portion of the femur bone. This portion of the bone has several, extremely important muscle insertions for the thigh and hip bones:

The lateral surface, quadrilateral in form, is broad, rough, convex, and marked by a diagonal impression, which extends from the postero-superior to the antero-inferior angle, and serves for the insertion of the tendon of the gluteus medius.

human_ape_femurs

Above the impression is a triangular surface, sometimes rough for part of the tendon of the same muscle, sometimes smooth for the interposition of a bursa between the tendon and the bone. Below and behind the diagonal impression is a smooth triangular surface, over which the tendon of the gluteus maximus lies, a bursa being interposed.

The medial surface, of much less extent than the lateral, presents at its base a deep depression, the trochanteric fossa (digital fossa), for the insertion of the tendon of the obturator externus, and above and in front of this an impression for the insertion of the obturator internus and superior and inferior gemellus muscles.

Reference: (https://en.wikipedia.org/wiki/Greater_trochanter)

The Lesser Trochanter

The Lesser trochanter is on the underside of the femoral head and also has several muscular insertions: The Psoas Major on bottom and the Illiacus on top.

The Femoral HeadFemur_insertion_point

The Femoral Head is the highest part of the femur bone, support by the femoral neck. It inserts as a ball/socket joint into the Hip/Ilium via the structure depicted to the right.

The Femoral Neck

The Femoral neck usually sits at a 120-135 degree angle with some variation. A fracture of this area is known as a hip fracture and happens during aging. This structure supports the head of the femur bone and its insertion into the hip.

femur_pic_grays_2The Femoral Body

The Shaft of the femur is somewhat curved and has a protruding ridge called the linea aspera (rough line). The area of the bone supports the strongest muscle tissue in the body, including the hamstrings, Quadriceps, and thigh musculature. The Vastus Laterallis (outer quadricep) and adductor magnus (inner thigh muscle) connects into the linea aspera.

Lower Portion of the Femur

lower_femur_grays

The Lower portion of the femur bone consists of two condyle (from the Greek word for knuckle), lateral and medial that create the surface for the upper tibia bone and the knee-joint. Coated meniscus tissue layers on top of the bone and provides synovial fluid for frictionless movement within the knee. The medial (inside) condyle is the larger than the lateral due to its increased weight-bearing. 

How the Femur Bone affects your Holistic Health

Femur bone fractures correlate with increased disease in the elderly. It is safe to say that the femur bone is an organ that houses much of the mineral deposits for the body. Therefore, as we age and the bone tissue become more porous, this bone become one of the primary areas of decomposition.

Bone Marrow and the formations of new blood cells

Red Bone Marrow

  • Red bone marrow is the primary site for hematopoiesis, the formation of blood cells.
  • It is located in the cavities of certain bones, including the femur, pelvis, ribs, vertebrae, and sternum.
  • Red marrow consists of a network of blood vessels, various types of blood-forming cells, and supporting tissue called stroma.
  • Hematopoietic stem cells (HSCs) within the red marrow are the source of all blood cells. These stem cells have the remarkable ability to differentiate into various types of blood cells.
  • Red marrow is highly active in producing blood cells during early life when there is a significant need for rapid growth and the formation of a robust blood cell population.
  • Red marrow plays a vital role in supporting the high demand for red blood cells, white blood cells, and platelets in growing children.
  • Red marrow primarily produces red blood cells, white blood cells (granulocytes, lymphocytes, and monocytes), and platelets.
  • Red blood cells are responsible for oxygen transport in the body.
  • White blood cells play a vital role in the immune system’s defense against infections.
  • Platelets are essential for blood clotting and wound healing.

Bone Marrow during the aging process:

  • As an individual grows and matures, some of the red bone marrow within the femur and other long bones gradually undergoes a transformation into yellow bone marrow.
  • This transformation involves the conversion of hematopoietic (blood-forming) tissue into adipose (fat) tissue.
  • The shift from red to yellow marrow is part of a natural process that occurs with aging and is influenced by factors such as hormonal changes and the body’s decreasing need for rapid blood cell production.
  • While yellow marrow is predominant in the central cavity of long bones like the femur in adults, red marrow still exists in other locations, such as the axial skeleton (e.g., pelvis, sternum, vertebrae).
  • Red marrow retains its hematopoietic activity in these areas and can be mobilized when there is a greater demand for blood cell production, such as in response to illness, injury, or certain medical conditions.

Yellow Bone Marrow

  • Yellow bone marrow is found in the central cavities of long bones, including the shaft of the femur.
  • It contains fewer blood-forming cells and is mainly composed of fat cells (adipocytes).
  • Yellow marrow stores fat and serves as an energy reserve for the body.
  • In certain circumstances, such as severe blood loss or chronic anemia, yellow marrow can transform back into red marrow to help replenish blood cell populations.

Adaptive Response of the Femur Bone:

  • The femur bone, like other bones in the body, can adapt to changing physiological needs.
  • In cases of severe blood loss, chronic anemia, or other conditions that require increased blood cell production, the femur’s red marrow can become more active, and additional sites within the femur may transition from yellow to red marrow to support hematopoiesis.

One of the primary aspects of bone health is acquiring enough calcium to maintain bone density. Most calcium is available via leafy green vegetables, notably kale, bok-choy, and broccoli. Sodas and carbonated beverages make it harder for the body to absorb calcium and should be avoided by those with osteoporosis (orthoinfo.com). Vitamin D is an important catalyst for absorbing calcium into the bloodstream.

Phosphorus is another vital nutrient to maintain bone health. Nuts, Sesame Seeds, peanut butter, parsley, crab and prawns are all foods high in phosphorus. Don’t feel like you have to eat meat or drink milk to get these essential nutrients.

References:
  1. https://en.wikipedia.org/wiki/Femur_neck
  2. https://en.wikipedia.org/wiki/Greater_trochanter
  3. https://orthoinfo.aaos.org/en/staying-healthy/calcium-nutrition-and-bone-health

Femur Bone Anatomy: Pillars of Support for the Human Skeleton Read More »

Mula Bandha | मूल बंध (Bandhas part 1/4)

The Mula Bandha and the Perineal Muscles

Sanskrit for “MULA” – मूल

Bulbospongiosus_Female

In Sanskrit, Mula means “root”, foundation, origin, source, and beginning. Bandha means energy lock, bond, hold, or harness. Mula bandha is the root of the body, the excretion point and the bottom of the spine. This is the same as the perineal muscle group and terminates between the coccyx and tailbone.

Strengthening the perineal muscles has a variety of effects, including greater control over sexual organs through strengthening the area between your sphincter and your sex organ. It is also healthy for digestion and excretion, two very important functions within the body.

Mula Bandha assists the body in breathing, most specifically with exhaling.

The pubococcygeus muscle is the primary agonist muscle to the perineal, and activates as a part of the levator ani muscle group. This is the muscle connects to the base of the spinal cord to contain energy within the spinal cord.

Bulbospongiosus muscle is a superficial muscle of the perineum, in both males and females covering the bulb of the sex organ, or vaginal wall and penis shaft. Then it connects to the front of the anus in two symmetrical parts. This is said to be the orgasm muscle, contributing to erection, ejaculation, and closes the vagina during intercourse. It is extremely important to the functioning of the sex organs and the muscles of excretion.

How to Activate Mula Bandha

Mula bandha is the primary bandha in yoga, it is said to seal energy into the spinal cord. Iyengar said that while one is working with the mula bandha, they are focused on the root of existence and creation. Ideally, you can practice this after an inhale, while you retain your breath. Squeeze your sex organs up and in while holding your breath for a few moments, then release. A 5 count can work well to start, then start working between exhale and inhale, when the breath has left the body completely, then engage the bottom of your diaphragm as the exhale completes, or essentially squeeze the exhale out. This is your Mula Bandha.

Perineal muscle activation is one of the most important and beneficial parts of a yoga practice, particularly involving inversions. Contraction of these floor muscles allow the abdomen to move in space without too much consequence, especially handstand will force it to strengthen in ways that the muscle would not normally need to.

Practice activating, then resting the mula bandha in breathing exercises with Kumbhaka (space between breaths) and during poses like warrior 2, standing splits. Find some time to experiment and strengthen the muscle during your practice.

The mula bandha is the Muladhara shakra of tantric traditions. I am not a big fan of the tantric traditions to I mostly ignore the chakras.

The Other Bandha’s interlockings, or muscle groups

Part 2: The Uddyiana Bandha

Part 3: Jalandhara Bandha

Part 4: Jihva Bandha

References for the Mula Bandha

  1. Wikipedia – Perineum
  2. Yoga International – Root Lock
  3. Ekhart Yoga – Mula Bandha

Mula Bandha | मूल बंध (Bandhas part 1/4) Read More »

Scroll to Top

Subscribe

Get email updates of new articles when they are published

We promise we’ll never spam! Take a look at our Privacy Policy for more info.